CountDownLatch CountDownLatch也叫闭锁, 它允许一个或多个线程一直等待,直到其他线程的操作执行完后再执行。
使用示例 CountDownLatch的构造函数接收一个int类型的参数作为计数器,如果你想等待 N个点
备注:由于CountDownLatch方法可以用在任何地方,这里说的N个点,可以是N个线程,也可以是1个线程里的N个执行步骤。用在多个线程时,只需要把CountDownLatch的引用传递到线程里即可。
示例(所有工人工作完成后在打印完成):
1
2
3
4
5
6
7
8
9
10
11
12
13
14
15
16
17
18
19
20
21
22
23
24
25
26
27
28
29
30
31
32
33
34
35
36
37
38
39
40
41
42
43
44
45
46
47
48
49
50
51
52
53
54
55
56
57
58
59
60
61
62
63
64
public class CountDownLatchDemo {public static void main (String[] args) {CountDownLatch latch = new CountDownLatch (2 );Thread t1 = new Thread (new Runnable () {@Override public void run () {try {5000 );catch (InterruptedException ignore) {"t1" );Thread t2 = new Thread (new Runnable () {@Override public void run () {try {10000 );catch (InterruptedException ignore) {"t2" );Thread t3 = new Thread (new Runnable () {@Override public void run () {try {"线程 t3 从 await 中返回了" );catch (InterruptedException e) {"线程 t3 await 被中断" );"t3" );Thread t4 = new Thread (new Runnable () {@Override public void run () {try {"线程 t4 从 await 中返回了" );catch (InterruptedException e) {"线程 t4 await 被中断" );"t4" );
该例子, t3和t4会一直阻塞至 t1,t2全部完成后才会执行
源码分析 构造方法 需要传入一个不小于 0 的整数:
1
2
3
4
5
6
7
8
9
10
11
12
public CountDownLatch (int count) {if (count < 0 ) throw new IllegalArgumentException ("count < 0" );this .sync = new Sync (count);private static final class Sync extends AbstractQueuedSynchronizer {int count) {
AQS 里面的 state 是一个整数值,这边用一个 int count 参数其实初始化就是设置了这个值,所有调用了 await 方法的等待线程会挂起,然后有其他一些线程会做 state = state - 1 操作,当 state 减到 0 的同时,那个线程会负责唤醒调用了 await 方法的所有线程。
对于 CountDownLatch,我们仅仅需要关心两个方法,一个是 countDown() 方法,另一个是 await() 方法。countDown() 方法每次调用都会将 state 减 1,直到 state 的值为 0;而 await 是一个阻塞方法,当 state 减为 0 的时候,await 方法才会返回。
await await() 方法,它代表线程阻塞,等待 state 的值减为 0。
1
2
3
4
5
6
7
8
9
10
11
12
13
14
15
16
public void await () throws InterruptedException {1 );public final void acquireSharedInterruptibly (int arg) throws InterruptedException {if (Thread.interrupted())throw new InterruptedException ();if (tryAcquireShared(arg) < 0 )protected int tryAcquireShared (int acquires) {return (getState() == 0 ) ? 1 : -1 ;
接下来是 doAcquireSharedInterruptibly , 从方法名我们就可以看出,这个方法是获取共享锁,并且此方法是可中断的(中断的时候抛出 InterruptedException 退出这个方法):
1
2
3
4
5
6
7
8
9
10
11
12
13
14
15
16
17
18
19
20
21
22
23
24
25
26
27
28
29
30
31
32
33
34
35
36
37
38
39
40
41
42
43
44
45
46
47
48
private void doAcquireSharedInterruptibly (int arg) throws InterruptedException {final Node node = addWaiter(Node.SHARED);boolean failed = true ;try {for (;;) {final Node p = node.predecessor();if (p == head) {int r = tryAcquireShared(arg);if (r >= 0 ) {null ; false ;return ;if (shouldParkAfterFailedAcquire(p, node) &&throw new InterruptedException ();finally {if (failed)private static boolean shouldParkAfterFailedAcquire (Node pred, Node node) {int ws = pred.waitStatus;if (ws == Node.SIGNAL)return true ;if (ws > 0 ) {do {while (pred.waitStatus > 0 );else {return false ;
结合上述的demo分析源码过程:
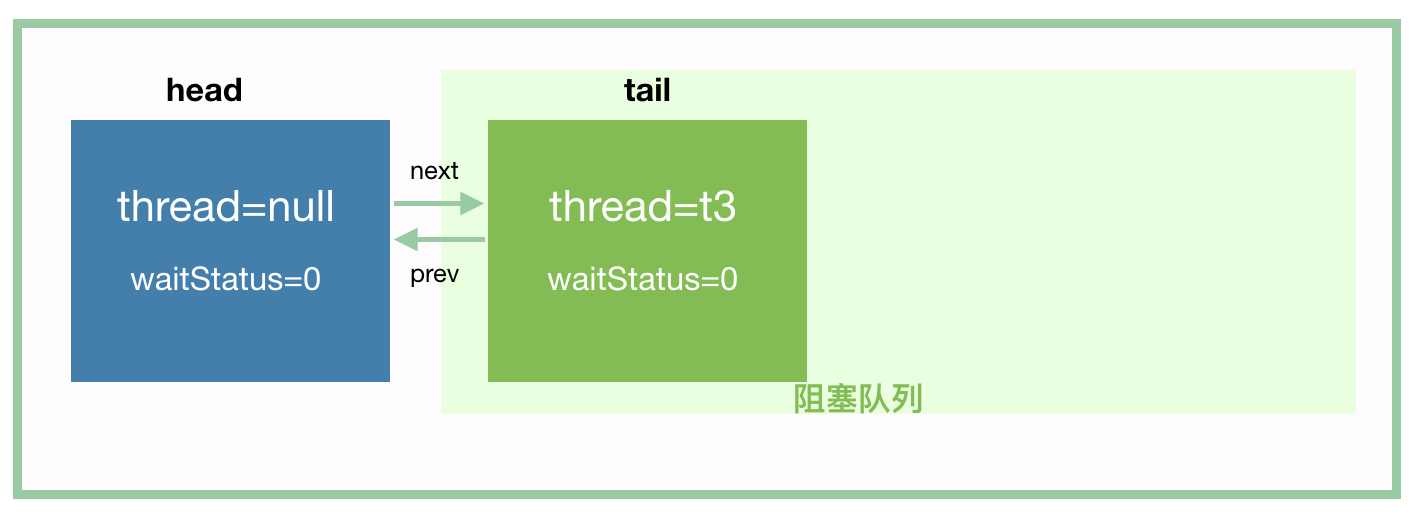
(1) 首先线程t3经过第一步addWaiter入队,得到阻塞队列如下:
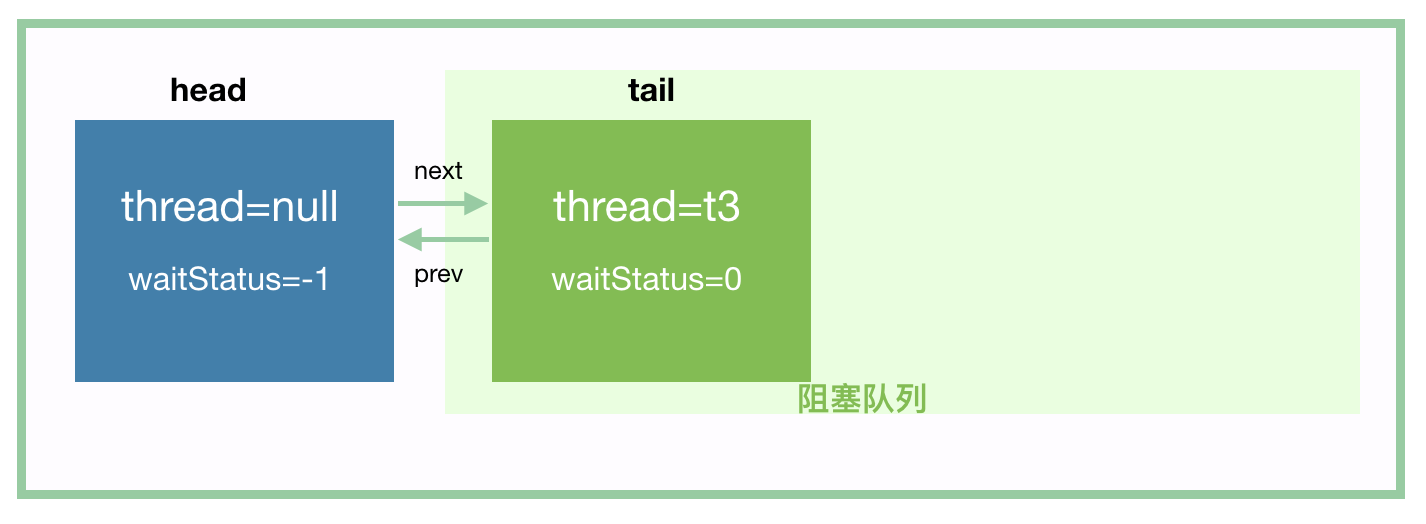
(2) 由于 tryAcquireShared 这个方法会返回 -1,所以 if (r >= 0) 这个分支不会进去。到 shouldParkAfterFailedAcquire 的时候,t3 将 head 的 waitStatus 值设置为 -1,并开始下一次循环,如下:
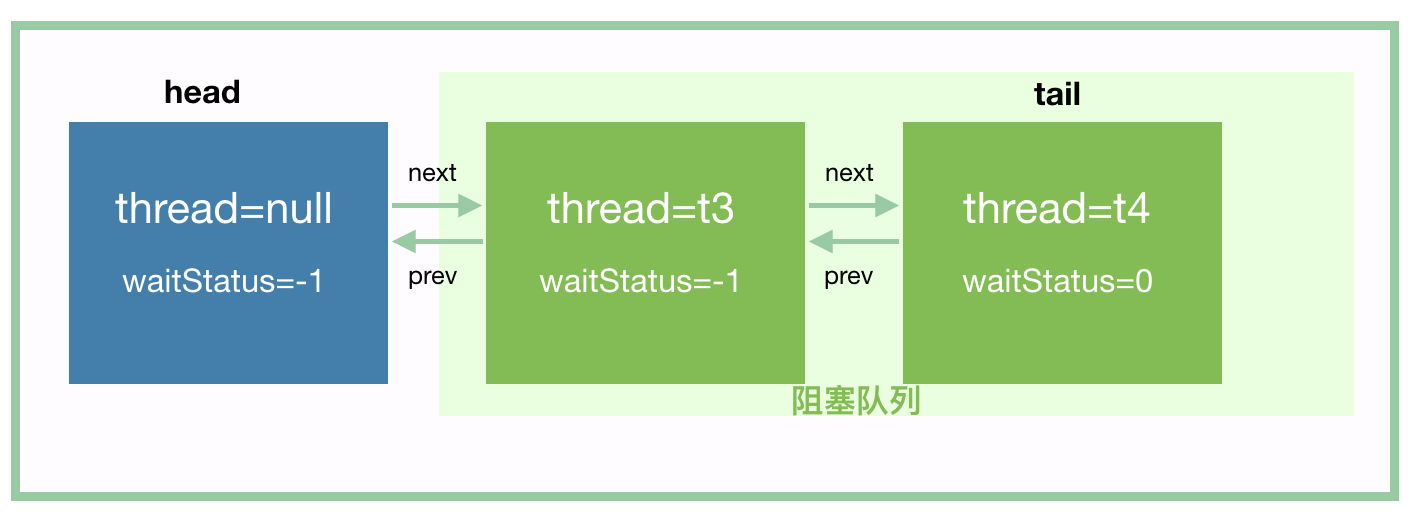
(3) 进入到 parkAndCheckInterrupt 的时候,t3 挂起, 再分析 t4 入队,t4 会将前驱节点 t3 所在节点的 waitStatus 设置为 -1,t4 入队后,应该是这样的:
这样t3和t4都被挂起了,等待唤醒
countDown 流程 1 2 3 4 5 6 7 8 9 10 11 12 13 14 15 16 17 18 19 20 21 22 23 24 25 26 public void countDown () {1 );public final boolean releaseShared (int arg) {if (tryReleaseShared(arg)) {return true ;return false ;protected boolean tryReleaseShared (int releases) {for (;;) {int c = getState();if (c == 0 )return false ;int nextc = c-1 ;if (compareAndSetState(c, nextc))return nextc == 0 ;
countDown 方法就是每次调用都将 state 值减 1,如果 state 减到 0 了,那么就调用下面的方法进行唤醒阻塞队列中的线程:
1 2 3 4 5 6 7 8 9 10 11 12 13 14 15 16 17 18 19 20 21 22 private void doReleaseShared () {for (;;) {Node h = head;if (h != null && h != tail) {int ws = h.waitStatus;if (ws == Node.SIGNAL) {if (!compareAndSetWaitStatus(h, Node.SIGNAL, 0 ))continue ; else if (ws == 0 &&0 , Node.PROPAGATE)) continue ; if (h == head)break ;
这里已经把head之后的第一个节点给唤醒了,返回到刚刚 await 中断的地方看 parkAndCheckInterrupt 返回false(线程没有中断的情况下):
1 2 3 4 5 6 7 8 9 10 11 12 13 14 15 16 17 18 19 20 21 22 23 24 25 26 private void doAcquireSharedInterruptibly (int arg) throws InterruptedException {final Node node = addWaiter(Node.SHARED);boolean failed = true ;try {for (;;) {final Node p = node.predecessor();if (p == head) {int r = tryAcquireShared(arg);if (r >= 0 ) {null ; false ;return ;if (shouldParkAfterFailedAcquire(p, node) &&throw new InterruptedException ();finally {if (failed)
然后就会调用 setHeadAndPropagate(node, r) 占领头节点,然后唤醒队列的其他线程:
1 2 3 4 5 6 7 8 9 10 11 12 13 14 private void setHeadAndPropagate (Node node, int propagate) {Node h = head;if (propagate > 0 || h == null || h.waitStatus < 0 ||null || h.waitStatus < 0 ) {Node s = node.next;if (s == null || s.isShared())
接着回到 doReleaseShared,这里经过之前的流程第一个节点(t3)已经是头节点了 :
1 2 3 4 5 6 7 8 9 10 11 12 13 14 15 16 17 18 19 20 21 22 23 24 25 26 27 28 29 30 31 32 33 34 35 private void doReleaseShared () {for (;;) {Node h = head;if (h != null && h != tail) {int ws = h.waitStatus;if (ws == Node.SIGNAL) {if (!compareAndSetWaitStatus(h, Node.SIGNAL, 0 ))continue ; else if (ws == 0 &&0 , Node.PROPAGATE))continue ; if (h == head) break ;
CyclicBarrier CyclicBarrier 字面意思回环栅栏,通过它可以实现让一组线程等待至某个状态之后再全部同时执行。
CyclicBarrier 的源码是基于 Condition 实现的
使用例子 这里模拟的是旅游出发的时候, 导游等到每个人都到达了,出发前把签证发到每个人手上在一起出发。
1 2 3 4 5 6 7 8 9 10 11 12 13 14 15 16 17 18 19 20 21 22 23 24 25 26 27 28 29 30 31 32 33 34 35 36 37 38 39 40 41 42 43 44 45 46 47 48 49 50 51 52 53 public class CyclicBarrierDemo {public static void main (String[] args) {CyclicBarrier cyclicBarrier = new CyclicBarrier (3 , new TourGuideTask ());Executor executor = Executors.newFixedThreadPool(3 );new TravelTask (cyclicBarrier, "哈登" , 5 ));new TravelTask (cyclicBarrier, "保罗" , 3 ));new TravelTask (cyclicBarrier, "戈登" , 1 ));static class TravelTask implements Runnable {private CyclicBarrier cyclicBarrier;private String name;private int arriveTime;public TravelTask (CyclicBarrier cyclicBarrier, String name, int arriveTime) {this .cyclicBarrier = cyclicBarrier;this .name = name;this .arriveTime = arriveTime;@Override public void run () {try {1000 );"到达集合点" );"开始旅行啦~~" );catch (InterruptedException e) {catch (BrokenBarrierException e) {static class TourGuideTask implements Runnable {@Override public void run () {"****导游分发护照签证****" );try {2000 );catch (InterruptedException e) {
基本属性 1 2 3 4 5 6 7 8 9 10 11 12 13 14 15 16 17 18 19 20 21 22 23 24 25 26 27 28 29 30 31 32 33 34 35 36 37 38 39 public class CyclicBarrier {private static class Generation {boolean broken = false ;private final ReentrantLock lock = new ReentrantLock ();private final Condition trip = lock.newCondition();private final int parties;private final Runnable barrierCommand;private Generation generation = new Generation ();private int count;public CyclicBarrier (int parties, Runnable barrierAction) {if (parties <= 0 ) throw new IllegalArgumentException ();this .parties = parties;this .count = parties;this .barrierCommand = barrierAction;public CyclicBarrier (int parties) {this (parties, null );
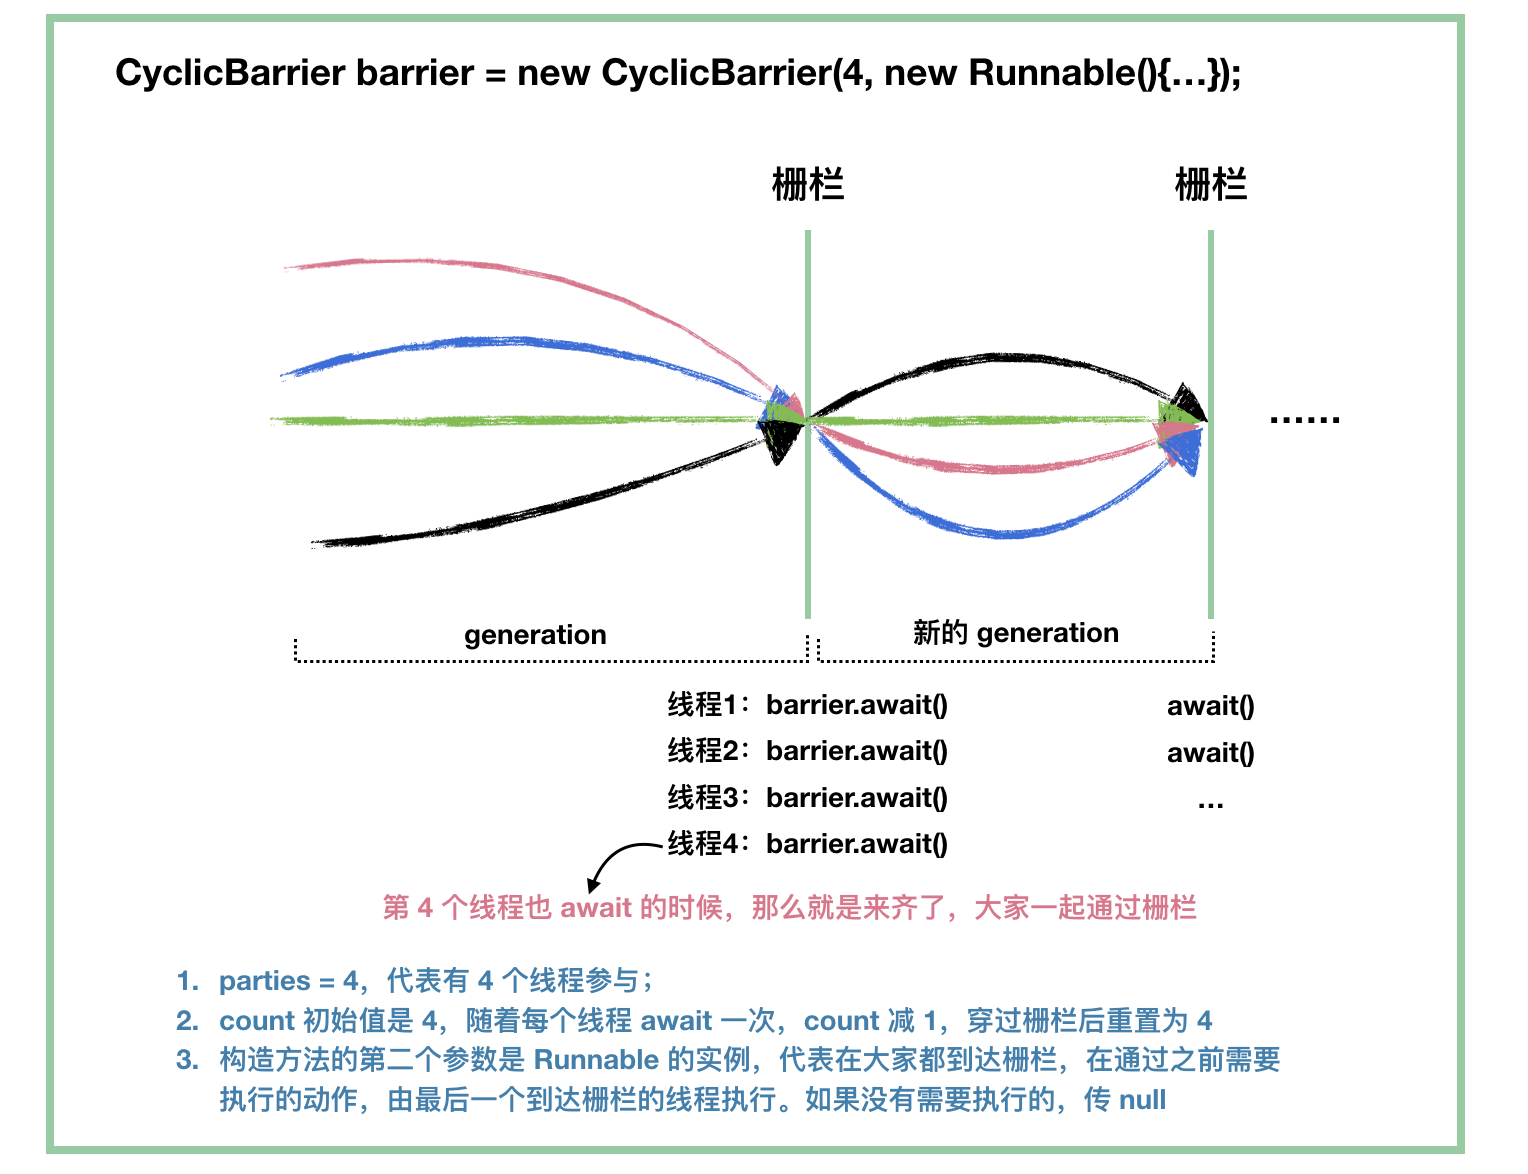
概念图:
源码分析 开启新的一代(nextGeneration) 开启新的一代,类似于重新实例化一个 CyclicBarrier 实例
1 2 3 4 5 6 7 8 9 private void nextGeneration ()new Generation();
打破一个栅栏 1 2 3 4 5 6 7 8 private void breakBarrier ()true ;
await-等待通过栅栏 等待通过栅栏方法 await 方法:
1 2 3 4 5 6 7 8 9 10 11 12 13 14 15 public int await () throws InterruptedException, BrokenBarrierException try {return dowait (false , 0 L) catch (TimeoutException toe) {throw new Error(toe); public int await (long timeout, TimeUnit unit) throws InterruptedException, BrokenBarrierException, TimeoutException {return dowait(true , unit.toNanos(timeout));
doawait:
1 2 3 4 5 6 7 8 9 10 11 12 13 14 15 16 17 18 19 20 21 22 23 24 25 26 27 28 29 30 31 32 33 34 35 36 37 38 39 40 41 42 43 44 45 46 47 48 49 50 51 52 53 54 55 56 57 58 59 60 61 62 63 64 65 66 67 68 69 70 71 72 73 74 75 76 77 78 79 80 81 82 83 84 85 86 87 88 89 90 91 92 private int dowait (boolean timed, long nanos) throws InterruptedException, BrokenBarrierException,final ReentrantLock lock = this .lock;try {final Generation g = generation;if (g.broken)throw new BrokenBarrierException ();if (Thread.interrupted()) {throw new InterruptedException ();int index = --count;if (index == 0 ) { boolean ranAction = false ;try {final Runnable command = barrierCommand;if (command != null )true ;return 0 ;finally {if (!ranAction)for (;;) {try {if (!timed)else if (nanos > 0L )catch (InterruptedException ie) {if (g == generation && ! g.broken) {throw ie;else {if (g.broken)throw new BrokenBarrierException ();if (g != generation)return index;if (timed && nanos <= 0L ) {throw new TimeoutException ();finally {
栅栏被打破的情况:
中断,如果某个等待的线程发生了中断,那么会打破栅栏,同时抛出 InterruptedException 异常 超时,打破栅栏,同时抛出 TimeoutException 异常 指定执行的操作抛出了异常 栅栏上处于等待状态的线程 1 2 3 4 5 6 7 8 9 10 public int getNumberWaiting () {final ReentrantLock lock = this .lock;try {return parties - count;finally {
重置一个栅栏 1 2 3 4 5 6 7 8 9 10 11 12 public void reset () {final ReentrantLock lock = this .lock;try {finally {
如果初始化时,指定了线程 parties = 4,前面有 3 个线程调用了 await 等待,在第 4 个线程调用 await 之前,如果调用 reset 方法,那么会发生什么?
首先,打破栅栏,那意味着所有等待的线程(3个等待的线程)会唤醒,await 方法会通过抛出 BrokenBarrierException异常返回。然后开启新的一代,重置了 count 和 generation,相当于一切归零了。
Semaphore Semaphore 类似一个资源池(可以类比线程池),每个线程需要调用 acquire() 方法获取资源,然后才能执行,执行完后,需要 release 资源,让给其他的线程用。
基本思路:创建 Semaphore 实例的时候,需要一个参数 permits,这个基本上可以确定是设置给 AQS 的 state 的,然后每个线程调用 acquire 的时候,执行 state = state - 1,release 的时候执行 state = state + 1,当然,acquire 的时候,如果 state = 0,说明没有资源了,需要等待其他线程 release。
使用例子 semaphore 用来控制某类资源的线程数,比如数据库连接。读取几万个文件的数据到数据库中,由于文件读取是IO密集型任务,可以启动几十个线程并发读取,但是数据库连接数只有20个,这时就必须控制最多只有20
1 2 3 4 5 6 7 8 9 10 11 12 13 14 15 16 17 18 19 20 21 22 23 24 25 public class Semaphore {private static final int COUNT = 80 ;private static Executor executor = Executors.newFixedThreadPool(COUNT);private static Semaphore semaphore = new Semaphore (20 );public static void main (String[] args) {for (int i=0 ; i< COUNT; i++) {new ThreadTest .Task());static class Task implements Runnable {@Override public void run () {try {catch (InterruptedException e) {finally {
构造方法 这里和 ReentrantLock 类似,用了公平策略和非公平策略, 默认是非公平锁:
1 2 3 4 5 6 7 public Semaphore (int permits ) {new NonfairSync (permits );public Semaphore (int permits , boolean fair) {new FairSync (permits ) : new NonfairSync (permits );
acquire 基本上跟 reentrantLock 的 acquire 方法一样, 只不过多了两个可以传参的方法, 如果需要一次获取超过一个资源,可以用这个
1 2 3 4 5 6 7 8 9 10 11 12 13 14 15 16 17 18 19 20 21 22 23 24 25 public void acquire () throws InterruptedException {1 );public void acquireUninterruptibly () {1 );public void acquire (int permits ) throws InterruptedException {if (permits < 0 ) throw new IllegalArgumentException ();permits );public void acquireUninterruptibly (int permits ) {if (permits < 0 ) throw new IllegalArgumentException ();permits );public void acquireUninterruptibly () {1 );public final void acquireShared (int arg) {if (tryAcquireShared(arg) < 0 )
非公平和公平的tryAcquireShared Semaphore 分公平策略和非公平策略, 两种tryAcquireShared的实现:
1 2 3 4 5 6 7 8 9 10 11 12 13 14 15 16 17 18 19 20 21 22 23 24 25 26 protected int tryAcquireShared (int acquires) {for (;;) {if (hasQueuedPredecessors())return -1 ;int available = getState();int remaining = available - acquires;if (remaining < 0 ||return remaining;protected int tryAcquireShared (int acquires) {return nonfairTryAcquireShared(acquires);final int nonfairTryAcquireShared (int acquires) {for (;;) {int available = getState();int remaining = available - acquires;if (remaining < 0 ||return remaining;
其实也就是之前一样的,区别就是公平锁会判断是否有线程排队,而非公平锁是直接操作
doAcquireShared 由于 tryAcquireShared(arg) 返回小于 0 的时候,说明 state 已经小于 0 了(没资源了),此时 acquire 不能立马拿到资源,需要进入到阻塞队列等待, 执行doAcquireShared:
1 2 3 4 5 6 7 8 9 10 11 12 13 14 15 16 17 18 19 20 21 22 23 24 25 26 27 private void doAcquireShared (int arg) {final Node node = addWaiter(Node.SHARED);boolean failed = true ;try {boolean interrupted = false ;for (;;) {final Node p = node.predecessor();if (p == head) {int r = tryAcquireShared(arg);if (r >= 0 ) {null ; if (interrupted)false ;return ;if (shouldParkAfterFailedAcquire(p, node) &&true ;finally {if (failed)
这里跟之前的基本一模一样
release释放资源 线程被挂起后,就需要等待 release 释放资源:
1 2 3 4 5 6 7 8 9 10 11 12 13 14 15 16 17 18 19 20 21 22 23 public void release () {1 );public final boolean releaseShared (int arg) {if (tryReleaseShared(arg)) {return true ;return false ;protected final boolean tryReleaseShared (int releases) {for (;;) {int current = getState();int next = current + releases;if (next < current) throw new Error ("Maximum permit count exceeded" );if (compareAndSetState(current, next))return true ;
tryReleaseShared 方法总是会返回 true, 接下来执行 doReleaseShared 唤醒等待线程:
1 2 3 4 5 6 7 8 9 10 11 12 13 14 15 16 17 18 private void doReleaseShared () {for (;;) {Node h = head;if (h != null && h != tail) {int ws = h.waitStatus;if (ws == Node.SIGNAL) {if (!compareAndSetWaitStatus(h, Node.SIGNAL, 0 ))continue ; else if (ws == 0 &&0 , Node.PROPAGATE))continue ; if (h == head) break ;
这里跟 condition 的唤醒也基本差不多
参考资料 


