概述 在日常开发中, 定时任务是一个比较关键的功能。 Java 中一般使用 JDK 中 Timer、ScheduledExecutorService 和调度框架 Quartz等。 通常用于实现延时任务, 周期性任务等, 一般会有两种需求:
轮询定时任务:给定周期内扫描所有记录,查看是否有满足要求的数据。 延时消息:如常见的订单业务, 订单创建的时候发送一条 N 分钟到期的信息,一旦消息消费后便可判断订单是否可以取消 轮询的方式在数据量大的时候性能会比较差, 通常我们会选择第二种方式。
Timer Timer 调度任务有一次性调度和循环调度,循环调度有分为:
固定速率调度(fixRate) 固定时延调度(fixDelay):1 2 3 4 5 6 7 8 9 10 11 Timer timer = new Timer ();TimerTask timerTask = new TimerTask () {@Override public void run () {1000 );1000 , 1000 );
内部原理 Timer 类里包含一个任务队列和一个异步轮训线程。
任务队列是一个以下次执行时间比较的最小堆 任务队列里容纳了所有待执行的任务,所有的任务将会在这一个异步线程里执行,任务执行中代码不能抛出异常,否则会导致 Timer 线程挂掉,所有的任务都无法执行了。 单个任务也不易执行时间太长,否则会影响任务调度在时间上的精准性。比如你一个任务跑了太久,其它等着调度的任务就一直处于饥饿状态得不到调度。所有任务的执行都是这单一的 TimerThread 线程。 Timer 类:
1 2 3 4 5 6 7 8 9 10 11 12 class Timer {new TaskQueue ();new TimerThread (queue);class TaskQueue {new TimerTask[128 ];int size;
任务调度过程:
1 2 3 4 5 6 7 8 9 10 11 12 13 14 15 16 17 18 19 20 21 22 23 24 25 26 27 28 29 30 31 32 33 34 35 36 37 38 39 40 41 42 43 44 45 46 47 48 49 50 51 52 53 54 55 56 57 58 59 60 61 private void sched(TimerTask task , long time, long period) {synchronized (task .lock) {if (task .state != TimerTask.VIRGIN)throw new IllegalStateException("Task already scheduled or cancelled" );task .nextExecutionTime = time;task .period = period;task .state = TimerTask.SCHEDULED;task );if (queue.getMin() == task )private void mainLoop() {while (true ) {try {task ;boolean taskFired;synchronized (queue) {while (queue.isEmpty() && newTasksMayBeScheduled)if (queue.isEmpty())break ;task = queue.getMin();synchronized (task .lock) {if (task .state == TimerTask.CANCELLED) {continue ;task .nextExecutionTime;if (taskFired = (executionTime<=currentTime)) {if (task .period == 0 ) {task .state = TimerTask.EXECUTED;else {task .period<0 ? currentTime - task .periodtask .period);if (!taskFired) if (taskFired) task .run();catch (InterruptedException e) {
注意:
Timer 只能单线程调度 TimerTask 中出现的异常会影响到 Timer 的执行 ScheduledThreadPoolExecutor schedule 提交一个一次性触发的任务, 在给定延时后执行 ScheduleAtFixedRate 是基于固定时间间隔进行任务调度 ScheduleWithFixedDelay 取决于每次任务执行的时间长短,是基于不固定时间间隔的任务调度 使用:
1 2 3 4 5 6 7 8 9 10 11 12 13 14 15 16 17 18 19 20 21 22 23 24 25 26 27 ScheduledExecutorService scheduledExecutorService = Executors.newScheduledThreadPool(10 );public ScheduledFuture<?> schedule(long delay, public ScheduledFuture<?> scheduleAtFixedRate(long initialDelay,long period,public ScheduledFuture<?> scheduleWithFixedDelay(long initialDelay,long delay,
ScheduledThreadPoolExecutor 执行原理 无论是 scheduleAtFixedRate 还是 scheduleWithFixedDelay 都会把任务包装成 ScheduledFutureTask, 然后调用delayedExecute(RunnableScheduledFuture<?> task 处理,scheduleAtFixedRate为例:
1 2 3 4 5 6 7 8 9 10 11 12 13 14 15 16 17 18 19 20 public ScheduledFuture<?> scheduleAtFixedRate(Runnable command,if (command == null || unit == null )throw new NullPointerException ();if (period <= 0 )throw new IllegalArgumentException ();Void > sft =new ScheduledFutureTask <Void >(command,null ,Void > t = decorateTask(command, sft);return t;
delayedExecute 逻辑如下:
1 2 3 4 5 6 7 8 9 10 11 12 13 14 15 16 17 18 19 20 21 22 23 24 25 26 27 28 private void delayedExecute(RunnableScheduledFuture<?> task ) {if (isShutdown())task );else {super .getQueue().add(task );if (isShutdown() &&task .isPeriodic()) &&task ))task .cancel(false );else void ensurePrestart() {int wc = workerCountOf(ctl.get());if (wc < corePoolSize)null , true );else if (wc == 0 )null , false );
可以看到以上代码并没有包含任何控制或响应延时的代码,因此这些逻辑应该是由延迟队列本身来控制的,这样就可以直接使用继承自ThreadPoolExecutor的方法完成其他相同的部分, 构造函数显示队列类型是DelayedWorkQueue
那我们回到加入队列的任务 ScheduledFutureTask 的 run 方法:
1 2 3 4 5 6 7 8 9 10 11 12 13 14 15 16 17 18 19 20 21 22 23 24 25 26 27 28 29 30 31 32 33 34 35 36 37 38 39 40 41 42 43 44 45 46 47 public void run () boolean periodic = isPeriodic ();if (!canRunInCurrentRunState (periodic))cancel (false );else if (!periodic)run ();else if (ScheduledFutureTask.super.runAndReset ()) {setNextRunTime ();reExecutePeriodic (outerTask);private void setNextRunTime () long p = period;if (p > 0 )else triggerTime (-p);long triggerTime (long delay) return now () +1 )) ? delay : overflowFree (delay));void reExecutePeriodic (RunnableScheduledFuture<?> task) if (canRunInCurrentRunState (true )) {getQueue ().add (task);if (!canRunInCurrentRunState (true ) && remove (task))cancel (false );else ensurePrestart ();
TimeWheel 时间轮算法 TimeWheel时间轮算法,是一种实现延迟队列的巧妙且高效的算法,被应用在Netty,Zookeeper,Kafka等各种框架中, 应用场景广泛。
比如在Dubbo中,为增强系统的容错能力,会有相应的监听判断处理机制。比如RPC调用的超时机制的实现,消费者判断RPC调用是否超时,如果超时会将超时结果返回给应用层。
在Dubbo最开始的实现中,是将所有的返回结果(DefaultFuture)都放入一个集合中,并且通过一个定时任务,每隔一定时间间隔就扫描所有的future,逐个判断是否超时。
这样的实现方式虽然比较简单,但是存在一个问题就是会有很多无意义的遍历操作开销。比如一个RPC调用的超时时间是10秒,而设置的超时判定的定时任务是2秒执行一次,那么可能会有4次左右无意义的循环检测判断操作。
对于以上问题, 目的就是要减少额外扫描的次数,这样能减少 CPU 的开销, 时间轮可以很好的解决这个问题
时间轮介绍 单时间轮
单时间轮只有一个由bucket串起来的轮子,每个bucket下链接着未来对应时刻到期的节点。
假设相邻bucket到期时间的间隔为slot=1s,从当前时刻0s开始计时,1s时到期的定时器节点挂在bucket[1]下,2s时到期的定时器节点挂在bucket[2]下……
当tick检查到时间过去了1s时,bucket[1]下所有节点执行超时动作,当时间到了2s时,bucket[2]下所有节点执行超时动作……
上图只有 8 个 bucket, 如果按照 slot=expire 来算, 只能挂 8s 的定时任务, 超过 8s 可以使用 slot = expire % N, 这里需要引入 rotation 的概念,定时器中expire表示到期时间,rotation表示节点在时间轮转了几圈后才到期
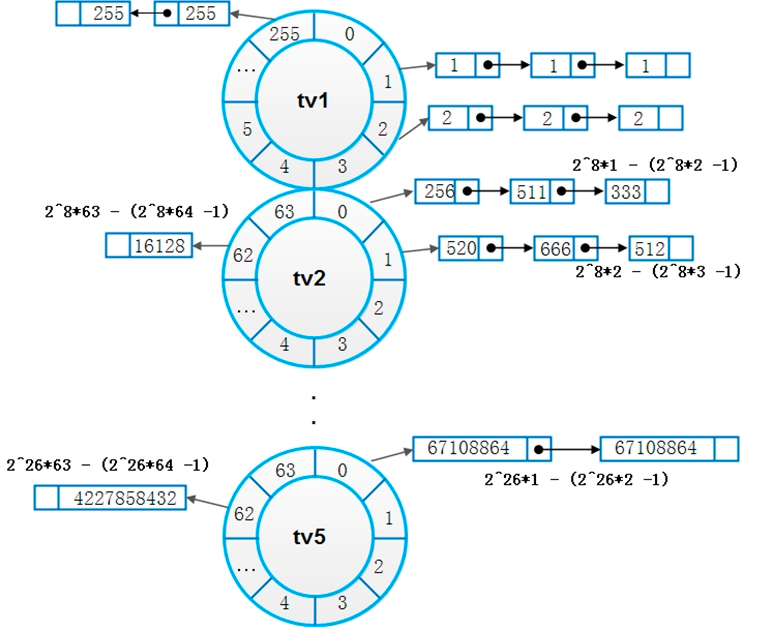
多时间轮
Linux的多时间轮算法,借鉴了日常生活中水表的度量方法,通过低刻度走得快的轮子带动高一级刻度轮子走动的方法,达到了仅使用较少刻度即可表示很大范围度量值的效果
netty HashedWheelTimer 源码分析 HashedWheelTimer 是接口 io.netty.util.Timer 的实现:
1 2 3 4 5 6 7 8 public interface Timer {Timeout newTimeout (TimerTask task, long delay, TimeUnit unit ) ;Set<Timeout> stop () ;
Timeout 是一个接口类, TimerTask 非常简单,就一个 run() 方法:
1 2 3 4 5 6 7 8 9 10 11 public interface TimerTask {void run (Timeout timeout ) throws Exceptionpublic interface Timeout {Timer timer () ;TimerTask task () ;boolean isExpired () ;boolean isCancelled () ;boolean cancel () ;
构造函数太多,摘要一下几个重要的参数:
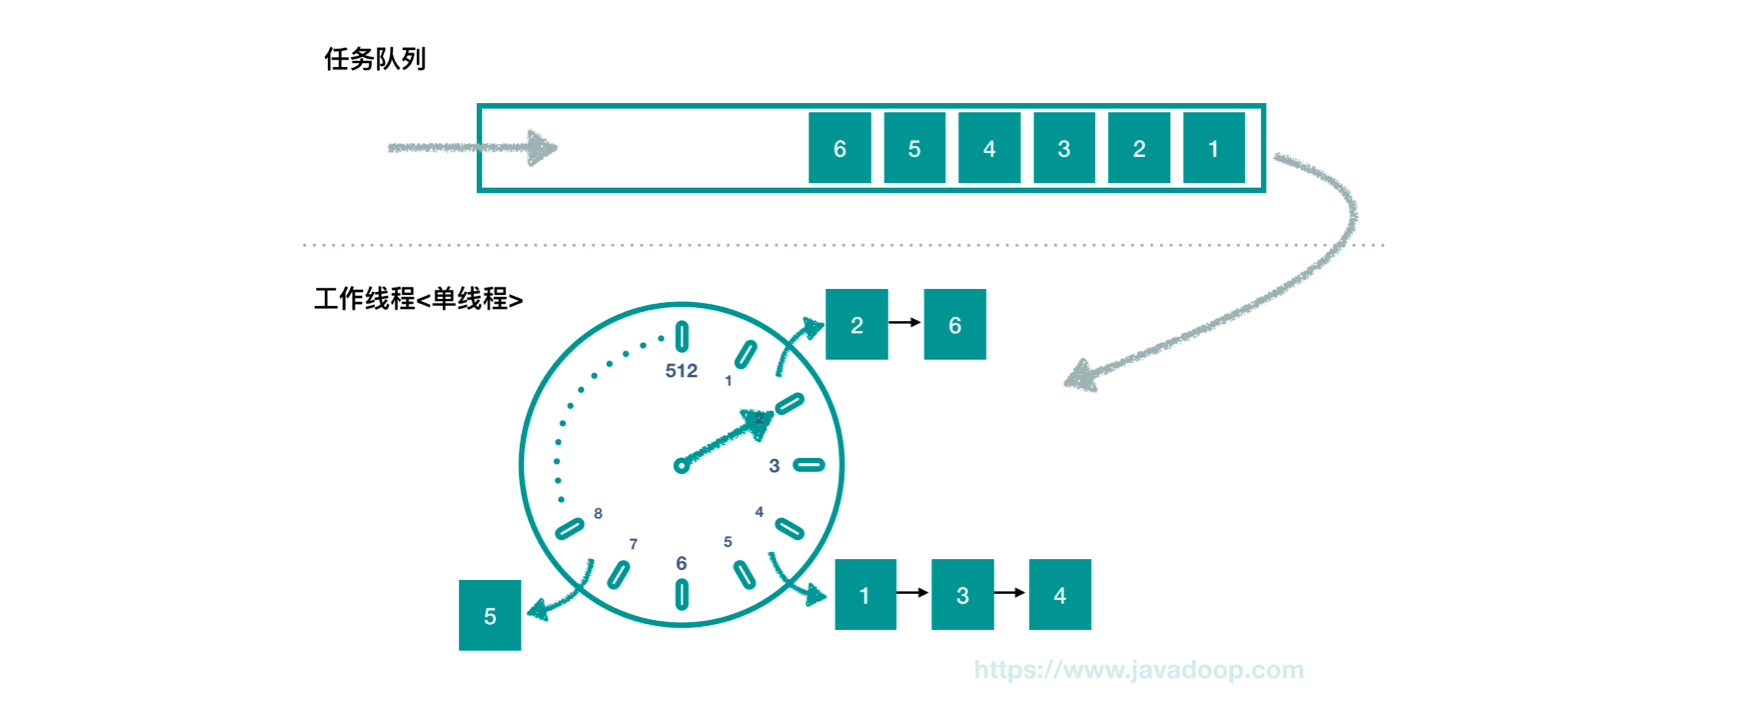
tickDuration 和 timeUnit 定义了一格的时间长度,默认的就是 100ms。 ticksPerWheel 定义了一圈有多少格,默认的就是 512; leakDetection:用于追踪内存泄漏 maxPendingTimeouts:最大允许等待的 Timeout 实例数,也就是我们可以设置不允许太多的任务等待。如果未执行任务数达到阈值,那么再次提交任务会抛出 RejectedExecutionException 异常。默认不限制。 HashedWheelTimer 提交任务:
1 2 3 4 5 6 7 8 9 10 11 12 13 14 15 16 17 18 19 20 21 22 23 24 25 26 27 28 29 30 31 32 33 34 35 public Timeout newTimeout(TimerTask task , long delay, TimeUnit unit) {if (task == null ) {throw new NullPointerException("task" );if (unit == null ) {throw new NullPointerException("unit" );long pendingTimeoutsCount = pendingTimeouts.incrementAndGet();if (maxPendingTimeouts > 0 && pendingTimeoutsCount > maxPendingTimeouts) {throw new RejectedExecutionException("Number of pending timeouts (" ") is greater than or equal to maximum allowed pending " "timeouts (" + maxPendingTimeouts + ")" );long deadline = System.nanoTime() + unit.toNanos(delay) - startTime;if (delay > 0 && deadline < 0 ) {Long .MAX_VALUE;new HashedWheelTimeout(this , task , deadline);return timeout;
这里的操作很简单:实例化 Timeout,然后放到任务队列中。需要注意的是,任务队列是 MPSC(Multiple Producer Single Consumer)队列, 刚好适用于这里的多生产线程,单消费线程的场景(这个队列是 JCTools 提供的一个并发数据结构)
Worker 线程工作原理:
1 2 3 4 5 6 7 8 9 10 11 12 13 14 15 16 17 18 19 20 21 22 23 24 25 26 27 28 29 30 31 32 33 34 35 36 37 38 39 40 41 42 43 44 45 46 47 48 49 50 51 52 53 54 55 56 57 58 59 60 61 62 63 64 private final class Worker implements Runnable {private final Set<Timeout> unprocessedTimeouts = new HashSet <Timeout>();private long tick;@Override public void run () {if (startTime == 0 ) {1 ;do {final long deadline = waitForNextTick();if (deadline > 0 ) {int idx = (int ) (tick & mask);HashedWheelBucket bucket = wheel[idx];while (WORKER_STATE_UPDATER.get(HashedWheelTimer.this ) == WORKER_STATE_STARTED);for (HashedWheelBucket bucket: wheel) {for (;;) {HashedWheelTimeout timeout = timeouts.poll();if (timeout == null ) {break ;if (!timeout.isCancelled()) {
在细看一下 run 流程中几个重要的方法, waitForNextTick 在每个 tick 到期返回:
1 2 3 4 5 6 7 8 9 10 11 12 13 14 15 16 17 18 19 20 21 22 23 24 25 26 27 28 29 30 31 32 33 34 35 36 37 38 39 40 41 42 43 44 45 46 private long waitForNextTick() {long deadline = tickDuration * (tick + 1 );for (;;) {final long currentTime = System.nanoTime() - startTime;long sleepTimeMs = (deadline - currentTime + 999999 ) / 1000000 ;if (sleepTimeMs <= 0 ) {if (currentTime == Long .MIN_VALUE) {return -Long .MAX_VALUE;else {return currentTime;if (PlatformDependent.isWindows()) {10 * 10 ;try {catch (InterruptedException ignored) {if (WORKER_STATE_UPDATER.get(HashedWheelTimer.this ) == WORKER_STATE_SHUTDOWN) {return Long .MIN_VALUE;
接着看看转移队列到 bucket 中的方法 transferTimeoutsToBuckets:
1 2 3 4 5 6 7 8 9 10 11 12 13 14 15 16 17 18 19 20 21 22 23 24 25 26 27 28 private void transferTimeoutsToBuckets () {for (int i = 0 ; i < 100000 ; i++) {HashedWheelTimeout timeout = timeouts.poll();if (timeout == null ) {break ;if (timeout.state() == HashedWheelTimeout.ST_CANCELLED) {continue ;long calculated = timeout.deadline / tickDuration;final long ticks = Math.max(calculated, tick); int stopIndex = (int ) (ticks & mask);HashedWheelBucket bucket = wheel[stopIndex];
bucket 中任务的执行:
1 2 3 4 5 6 7 8 9 10 11 12 13 14 15 16 17 18 19 20 21 22 23 24 25 26 27 28 29 30 public void expireTimeouts(long deadline) {while (timeout != null ) {next = timeout.next ;if (timeout.remainingRounds <= 0 ) {next = remove(timeout);if (timeout.deadline <= deadline) {else {throw new IllegalStateException(String.format("timeout.deadline (%d) > deadline (%d)" , timeout.deadline, deadline));else if (timeout.isCancelled()) {next = remove(timeout);else {next ;
总的来说 HashedWheelTimer 工作原理如下:
参考资料 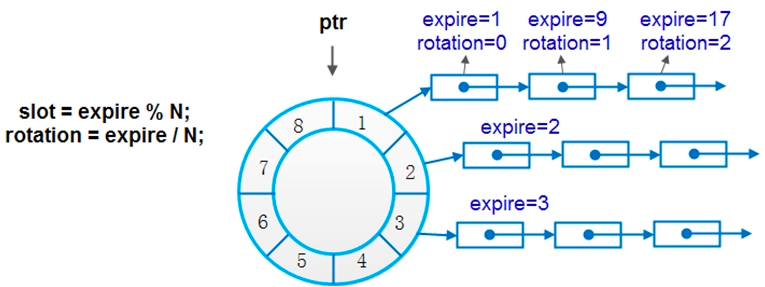
 )
)